---
title: Change styles via CSS
description: Change UI component styles using CSS.
sidebar:
icon: paintbrush
order: 20
---
## Overview
Updating the CSS allows you to change the UI of the components to meet your needs.
This section guides you through an example of updating the look of buttons.
Note that the process can update any HTML tag from within SuperTokens components.
## Before you start
:::warning
This example is relevant only if you use the prebuilt UI components.
:::
---
## Global style changes
First, open the website at `/auth`. The Sign-in widget should show up. Use the browser console to find out the class name that you'd like to overwrite.
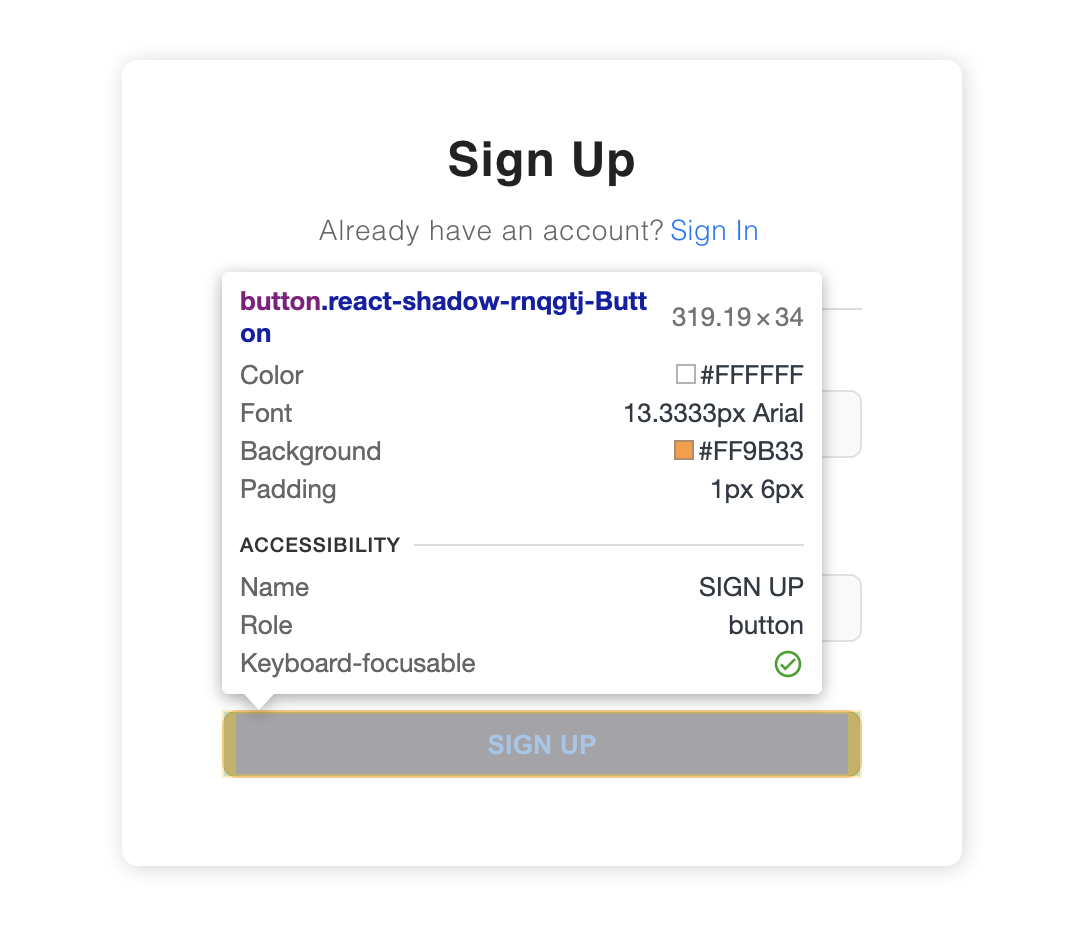
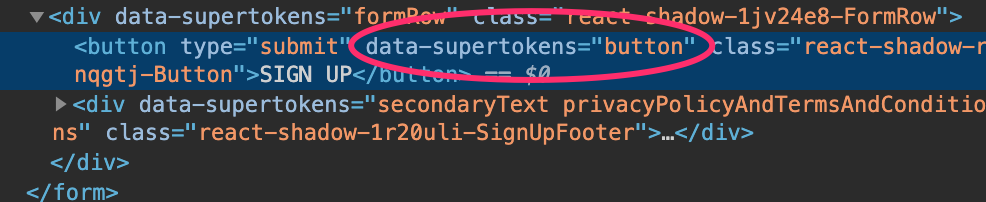 Each stylable component contains `data-supertokens` attributes (in this example `data-supertokens="button"`).
Let's customize elements with the `button` attribute. The syntax for styling is plain CSS.
```tsx
import SuperTokens from "supertokens-auth-react";
SuperTokens.init({
appInfo: {
apiDomain: "...",
appName: "...",
websiteDomain: "...",
},
style: `
[data-supertokens~=button] {
background-color: #252571;
border: 0px;
width: 30%;
margin: 0 auto;
}
`,
recipeList: [
/* ... */
],
});
```
```tsx check=false reason="pre-built UI globals are provided by the host framework"
// this goes in the auth route config of your frontend app (once the pre-built UI script has been loaded)
supertokensUIInit({
appInfo: {
apiDomain: "...",
appName: "...",
websiteDomain: "...",
},
style: `
[data-supertokens~=button] {
background-color: #252571;
border: 0px;
width: 30%;
margin: 0 auto;
}
`,
recipeList: [
/* ... */
],
});
```
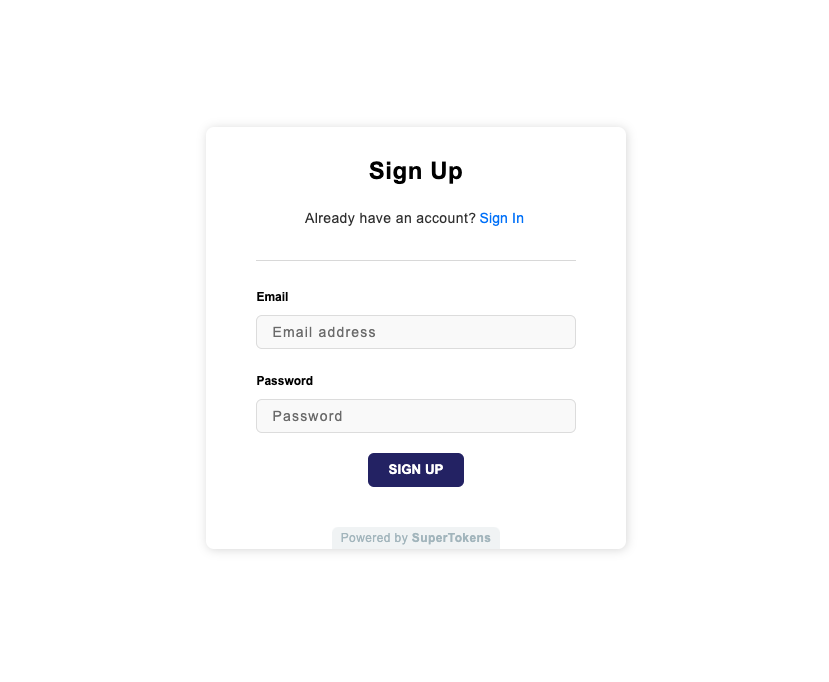
The above results in:
Each stylable component contains `data-supertokens` attributes (in this example `data-supertokens="button"`).
Let's customize elements with the `button` attribute. The syntax for styling is plain CSS.
```tsx
import SuperTokens from "supertokens-auth-react";
SuperTokens.init({
appInfo: {
apiDomain: "...",
appName: "...",
websiteDomain: "...",
},
style: `
[data-supertokens~=button] {
background-color: #252571;
border: 0px;
width: 30%;
margin: 0 auto;
}
`,
recipeList: [
/* ... */
],
});
```
```tsx check=false reason="pre-built UI globals are provided by the host framework"
// this goes in the auth route config of your frontend app (once the pre-built UI script has been loaded)
supertokensUIInit({
appInfo: {
apiDomain: "...",
appName: "...",
websiteDomain: "...",
},
style: `
[data-supertokens~=button] {
background-color: #252571;
border: 0px;
width: 30%;
margin: 0 auto;
}
`,
recipeList: [
/* ... */
],
});
```
The above results in:
 ### Changing fonts
By default, SuperTokens uses the `Arial` font. The best way to override this is to add a `font-family` styling to the `container` component in the recipe configuration.
```tsx
import SuperTokens from "supertokens-auth-react";
SuperTokens.init({
appInfo: {
apiDomain: "...",
appName: "...",
websiteDomain: "...",
},
style: `
[data-supertokens~=container] {
font-family: cursive;
}
`,
recipeList: [
/* ... */
],
});
```
```tsx check=false reason="pre-built UI globals are provided by the host framework"
// this goes in the auth route config of your frontend app (once the pre-built UI script has been loaded)
supertokensUIInit({
appInfo: {
apiDomain: "...",
appName: "...",
websiteDomain: "...",
},
style: `
[data-supertokens~=container] {
font-family: cursive;
}
`,
recipeList: [
/* ... */
],
});
```
### Using media queries
You may want to have different CSS for different `viewports`. This can happen via media queries like this:
```tsx
import SuperTokens from "supertokens-auth-react";
SuperTokens.init({
appInfo: {
apiDomain: "...",
appName: "...",
websiteDomain: "...",
},
style: `
[data-supertokens~=button] {
background-color: #252571;
border: 0px;
width: 30%;
margin: 0 auto;
}
@media (max-width: 440px) {
[data-supertokens~=button] {
width: 90%;
}
}
`,
recipeList: [
/* ... */
],
});
```
```tsx check=false reason="pre-built UI globals are provided by the host framework"
// this goes in the auth route config of your frontend app (once the pre-built UI script has been loaded)
supertokensUIInit({
appInfo: {
apiDomain: "...",
appName: "...",
websiteDomain: "...",
},
style: `
[data-supertokens~=button] {
background-color: #252571;
border: 0px;
width: 30%;
margin: 0 auto;
}
@media (max-width: 440px) {
[data-supertokens~=button] {
width: 90%;
}
}
`,
recipeList: [
/* ... */
],
});
```
---
## Customize the sign up and sign in forms
These are the screens shown when the user tries to log in or sign up for the application.
```tsx
import SuperTokens from "supertokens-auth-react";
SuperTokens.init({
appInfo: {
apiDomain: "...",
appName: "...",
websiteDomain: "...",
},
style: `[data-supertokens~=authPage] {
...
}`,
recipeList: [
/* ... */
],
});
```
```tsx check=false reason="pre-built UI globals are provided by the host framework"
// this goes in the auth route config of your frontend app (once the pre-built UI script has been loaded)
supertokensUIInit({
appInfo: {
apiDomain: "...",
appName: "...",
websiteDomain: "...",
},
style: `[data-supertokens~=authPage] {
...
}`,
recipeList: [
/* ... */
],
});
```
---
## Customize the password reset forms
### Send password reset email form
This form appears when the user clicks on "forgot password" in the sign in form.
```tsx
import SuperTokens from "supertokens-auth-react";
import EmailPassword from "supertokens-auth-react/recipe/emailpassword";
import Session from "supertokens-auth-react/recipe/session";
SuperTokens.init({
appInfo: {
apiDomain: "...",
appName: "...",
websiteDomain: "...",
},
recipeList: [
EmailPassword.init({
resetPasswordUsingTokenFeature: {
enterEmailForm: {
style: ` ... `,
},
},
}),
Session.init(),
],
});
```
```tsx check=false reason="pre-built UI globals are provided by the host framework"
// this goes in the auth route config of your frontend app (once the pre-built UI script has been loaded)
supertokensUIInit({
appInfo: {
apiDomain: "...",
appName: "...",
websiteDomain: "...",
},
recipeList: [
supertokensUIEmailPassword.init({
resetPasswordUsingTokenFeature: {
enterEmailForm: {
style: ` ... `,
},
},
}),
supertokensUISession.init(),
],
});
```
### Submit new password form
This screen appears when the user clicks the password reset link on their email - to enter their new password
```tsx
import SuperTokens from "supertokens-auth-react";
import EmailPassword from "supertokens-auth-react/recipe/emailpassword";
import Session from "supertokens-auth-react/recipe/session";
SuperTokens.init({
appInfo: {
apiDomain: "...",
appName: "...",
websiteDomain: "...",
},
recipeList: [
EmailPassword.init({
resetPasswordUsingTokenFeature: {
submitNewPasswordForm: {
style: ` ... `,
},
},
}),
Session.init(),
],
});
```
```tsx check=false reason="pre-built UI globals are provided by the host framework"
// this goes in the auth route config of your frontend app (once the pre-built UI script has been loaded)
supertokensUIInit({
appInfo: {
apiDomain: "...",
appName: "...",
websiteDomain: "...",
},
recipeList: [
supertokensUIEmailPassword.init({
resetPasswordUsingTokenFeature: {
submitNewPasswordForm: {
style: ` ... `,
},
},
}),
supertokensUISession.init(),
],
});
```
### Changing fonts
By default, SuperTokens uses the `Arial` font. The best way to override this is to add a `font-family` styling to the `container` component in the recipe configuration.
```tsx
import SuperTokens from "supertokens-auth-react";
SuperTokens.init({
appInfo: {
apiDomain: "...",
appName: "...",
websiteDomain: "...",
},
style: `
[data-supertokens~=container] {
font-family: cursive;
}
`,
recipeList: [
/* ... */
],
});
```
```tsx check=false reason="pre-built UI globals are provided by the host framework"
// this goes in the auth route config of your frontend app (once the pre-built UI script has been loaded)
supertokensUIInit({
appInfo: {
apiDomain: "...",
appName: "...",
websiteDomain: "...",
},
style: `
[data-supertokens~=container] {
font-family: cursive;
}
`,
recipeList: [
/* ... */
],
});
```
### Using media queries
You may want to have different CSS for different `viewports`. This can happen via media queries like this:
```tsx
import SuperTokens from "supertokens-auth-react";
SuperTokens.init({
appInfo: {
apiDomain: "...",
appName: "...",
websiteDomain: "...",
},
style: `
[data-supertokens~=button] {
background-color: #252571;
border: 0px;
width: 30%;
margin: 0 auto;
}
@media (max-width: 440px) {
[data-supertokens~=button] {
width: 90%;
}
}
`,
recipeList: [
/* ... */
],
});
```
```tsx check=false reason="pre-built UI globals are provided by the host framework"
// this goes in the auth route config of your frontend app (once the pre-built UI script has been loaded)
supertokensUIInit({
appInfo: {
apiDomain: "...",
appName: "...",
websiteDomain: "...",
},
style: `
[data-supertokens~=button] {
background-color: #252571;
border: 0px;
width: 30%;
margin: 0 auto;
}
@media (max-width: 440px) {
[data-supertokens~=button] {
width: 90%;
}
}
`,
recipeList: [
/* ... */
],
});
```
---
## Customize the sign up and sign in forms
These are the screens shown when the user tries to log in or sign up for the application.
```tsx
import SuperTokens from "supertokens-auth-react";
SuperTokens.init({
appInfo: {
apiDomain: "...",
appName: "...",
websiteDomain: "...",
},
style: `[data-supertokens~=authPage] {
...
}`,
recipeList: [
/* ... */
],
});
```
```tsx check=false reason="pre-built UI globals are provided by the host framework"
// this goes in the auth route config of your frontend app (once the pre-built UI script has been loaded)
supertokensUIInit({
appInfo: {
apiDomain: "...",
appName: "...",
websiteDomain: "...",
},
style: `[data-supertokens~=authPage] {
...
}`,
recipeList: [
/* ... */
],
});
```
---
## Customize the password reset forms
### Send password reset email form
This form appears when the user clicks on "forgot password" in the sign in form.
```tsx
import SuperTokens from "supertokens-auth-react";
import EmailPassword from "supertokens-auth-react/recipe/emailpassword";
import Session from "supertokens-auth-react/recipe/session";
SuperTokens.init({
appInfo: {
apiDomain: "...",
appName: "...",
websiteDomain: "...",
},
recipeList: [
EmailPassword.init({
resetPasswordUsingTokenFeature: {
enterEmailForm: {
style: ` ... `,
},
},
}),
Session.init(),
],
});
```
```tsx check=false reason="pre-built UI globals are provided by the host framework"
// this goes in the auth route config of your frontend app (once the pre-built UI script has been loaded)
supertokensUIInit({
appInfo: {
apiDomain: "...",
appName: "...",
websiteDomain: "...",
},
recipeList: [
supertokensUIEmailPassword.init({
resetPasswordUsingTokenFeature: {
enterEmailForm: {
style: ` ... `,
},
},
}),
supertokensUISession.init(),
],
});
```
### Submit new password form
This screen appears when the user clicks the password reset link on their email - to enter their new password
```tsx
import SuperTokens from "supertokens-auth-react";
import EmailPassword from "supertokens-auth-react/recipe/emailpassword";
import Session from "supertokens-auth-react/recipe/session";
SuperTokens.init({
appInfo: {
apiDomain: "...",
appName: "...",
websiteDomain: "...",
},
recipeList: [
EmailPassword.init({
resetPasswordUsingTokenFeature: {
submitNewPasswordForm: {
style: ` ... `,
},
},
}),
Session.init(),
],
});
```
```tsx check=false reason="pre-built UI globals are provided by the host framework"
// this goes in the auth route config of your frontend app (once the pre-built UI script has been loaded)
supertokensUIInit({
appInfo: {
apiDomain: "...",
appName: "...",
websiteDomain: "...",
},
recipeList: [
supertokensUIEmailPassword.init({
resetPasswordUsingTokenFeature: {
submitNewPasswordForm: {
style: ` ... `,
},
},
}),
supertokensUISession.init(),
],
});
```